> ## Documentation Index
> Fetch the complete documentation index at: https://docs-dev-feat-update-styling-docs-for-universal-components.mintlify.site/llms.txt
> Use this file to discover all available pages before exploring further.

# ユースケース：Formsを使用して追加のサインアップ手順を構成する

> Forms for Actionsを使用して追加のサインアップ手順を構成する方法を説明します。

<Card title="始める前に">
  1. 以下のスコープを有効にして、[マシンツーマシンアプリケーション](https://auth0.com/docs/get-started/auth0-overview/create-applications/machine-to-machine-apps)を作成します。

  * `read:users`
  * `update:users`
  * `create:users`
  * `read:users_app_metadata`
  * `update:users_app_metadata`
  * `create:users_app_metadata`

  2. マシンツーマシンアプリケーションの資格情報を使って[Vault接続](/docs/ja-jp/customize/forms/vault)を追加します。
</Card>

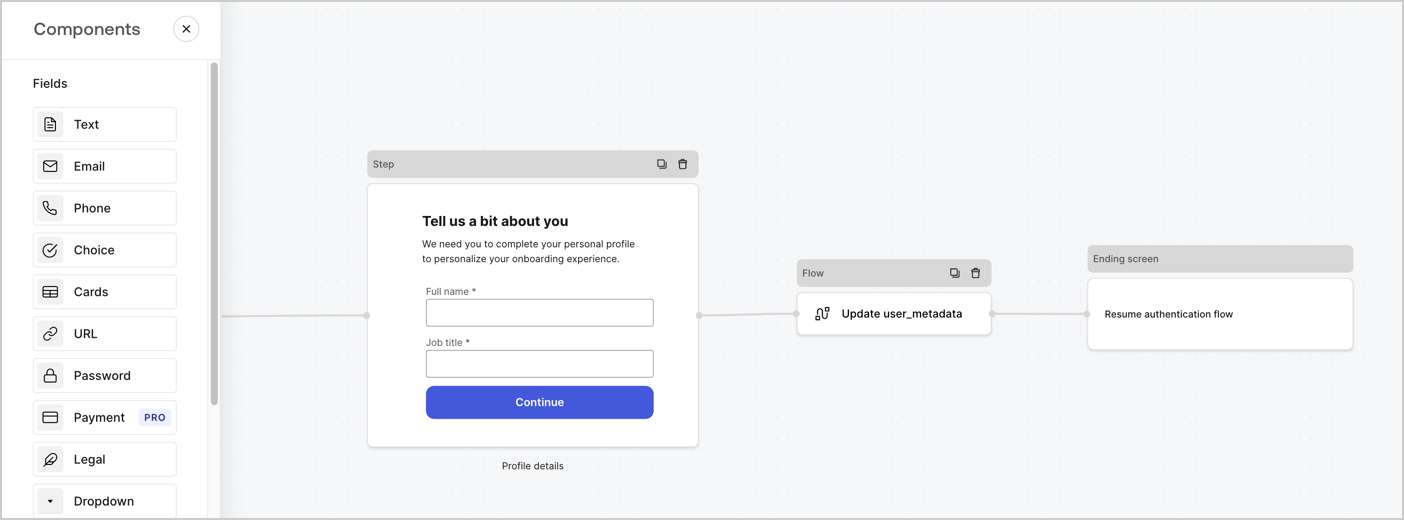
Forms for Actionsを使用すると、サインアップまたはログインフローに追加のステップを作成し、ユーザーがアプリケーションにアクセスできるようにする前にそれらのステップを必須にすることができます。
<Frame>
  <img src="https://mintcdn.com/docs-dev-feat-update-styling-docs-for-universal-components/hFRPscHtanaMWefT/docs/images/ja-jp/cdy7uua7fh8z/ZOQNi6SrEC9OREcBbdiJ3/d79f84fb61acd5473bdf932527e26d58/custom-signup-form.png?fit=max&auto=format&n=hFRPscHtanaMWefT&q=85&s=a5bba2da54520eef741048b22c8e247a" alt="Dashboard > Actions > Forms > Use Case Custom Signup Form" data-og-width="1404" width="1404" data-og-height="520" height="520" data-path="docs/images/ja-jp/cdy7uua7fh8z/ZOQNi6SrEC9OREcBbdiJ3/d79f84fb61acd5473bdf932527e26d58/custom-signup-form.png" data-optimize="true" data-opv="3" srcset="https://mintcdn.com/docs-dev-feat-update-styling-docs-for-universal-components/hFRPscHtanaMWefT/docs/images/ja-jp/cdy7uua7fh8z/ZOQNi6SrEC9OREcBbdiJ3/d79f84fb61acd5473bdf932527e26d58/custom-signup-form.png?w=280&fit=max&auto=format&n=hFRPscHtanaMWefT&q=85&s=9ffbe9b447aa1af37bba0326fd6c27bb 280w, https://mintcdn.com/docs-dev-feat-update-styling-docs-for-universal-components/hFRPscHtanaMWefT/docs/images/ja-jp/cdy7uua7fh8z/ZOQNi6SrEC9OREcBbdiJ3/d79f84fb61acd5473bdf932527e26d58/custom-signup-form.png?w=560&fit=max&auto=format&n=hFRPscHtanaMWefT&q=85&s=d780bdbb5f7fb9e76ea7986413fa8fcb 560w, https://mintcdn.com/docs-dev-feat-update-styling-docs-for-universal-components/hFRPscHtanaMWefT/docs/images/ja-jp/cdy7uua7fh8z/ZOQNi6SrEC9OREcBbdiJ3/d79f84fb61acd5473bdf932527e26d58/custom-signup-form.png?w=840&fit=max&auto=format&n=hFRPscHtanaMWefT&q=85&s=16ec8f5bba2b8d8a2127769b862aa004 840w, https://mintcdn.com/docs-dev-feat-update-styling-docs-for-universal-components/hFRPscHtanaMWefT/docs/images/ja-jp/cdy7uua7fh8z/ZOQNi6SrEC9OREcBbdiJ3/d79f84fb61acd5473bdf932527e26d58/custom-signup-form.png?w=1100&fit=max&auto=format&n=hFRPscHtanaMWefT&q=85&s=448b6fccde1a058c2637be40d2509131 1100w, https://mintcdn.com/docs-dev-feat-update-styling-docs-for-universal-components/hFRPscHtanaMWefT/docs/images/ja-jp/cdy7uua7fh8z/ZOQNi6SrEC9OREcBbdiJ3/d79f84fb61acd5473bdf932527e26d58/custom-signup-form.png?w=1650&fit=max&auto=format&n=hFRPscHtanaMWefT&q=85&s=c8a9f4f3acefb63c35350f3fb329c16b 1650w, https://mintcdn.com/docs-dev-feat-update-styling-docs-for-universal-components/hFRPscHtanaMWefT/docs/images/ja-jp/cdy7uua7fh8z/ZOQNi6SrEC9OREcBbdiJ3/d79f84fb61acd5473bdf932527e26d58/custom-signup-form.png?w=2500&fit=max&auto=format&n=hFRPscHtanaMWefT&q=85&s=8a437335471b442b30058da2fee087f2 2500w" />
</Frame>

以下のセクションでは、ノードとフローを使用して追加のサインアップステップフォームを作成する方法と、フォームを[ポストログイン](/docs/ja-jp/customize/actions/explore-triggers/signup-and-login-triggers/login-trigger)アクションに追加する手順について説明します。

## フォームをゼロから作成する

情報を収集するためのフォームを作成するには、次の手順に従ってください。

1. **［Auth0 Dashboard］>［Actions（アクション）］>［Forms（フォーム）］** の順に選択して、フォームエディターを開きます。
2. **［Create Form（フォームを作成）］** > **［Start from scratch（初めから作成する）］** の順に選択します。

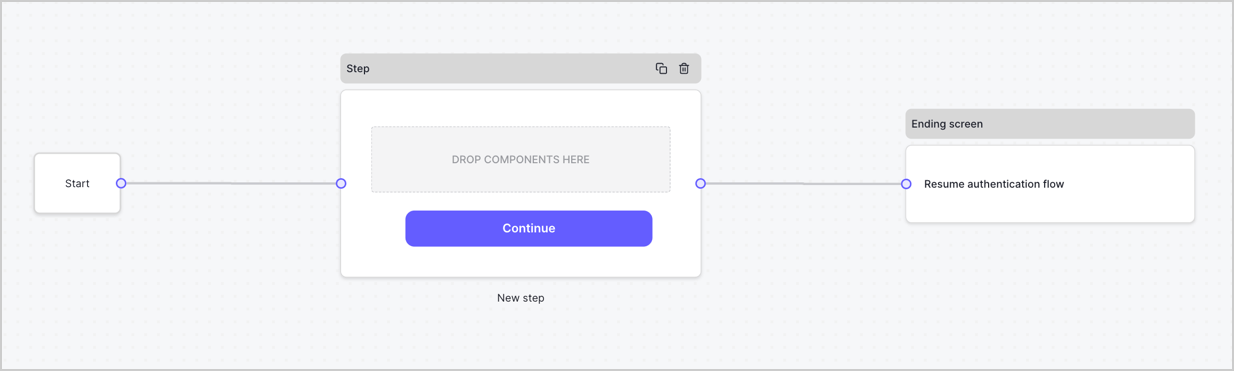
特に設定を変更しない限り、新しいフォームには開始ノード、ステップノード、および終了スクリーンノードが含まれます。
<Frame>
  <img src="https://mintcdn.com/docs-dev-feat-update-styling-docs-for-universal-components/oquzZmRinmaBtdQK/docs/images/ja-jp/cdy7uua7fh8z/2TZ9jSjgEcARFpULI6hz4R/a4319a1bd482f2ee5cc23100fdb2f42c/New-form-Forms-for-action-use-case.png?fit=max&auto=format&n=oquzZmRinmaBtdQK&q=85&s=e4a015a2c97c3651e0c00bc7b5e45c27" alt="Dashboard > Forms > Use Cases > Form" data-og-width="1234" width="1234" data-og-height="371" height="371" data-path="docs/images/ja-jp/cdy7uua7fh8z/2TZ9jSjgEcARFpULI6hz4R/a4319a1bd482f2ee5cc23100fdb2f42c/New-form-Forms-for-action-use-case.png" data-optimize="true" data-opv="3" srcset="https://mintcdn.com/docs-dev-feat-update-styling-docs-for-universal-components/oquzZmRinmaBtdQK/docs/images/ja-jp/cdy7uua7fh8z/2TZ9jSjgEcARFpULI6hz4R/a4319a1bd482f2ee5cc23100fdb2f42c/New-form-Forms-for-action-use-case.png?w=280&fit=max&auto=format&n=oquzZmRinmaBtdQK&q=85&s=8894c18cf1334f03187d0dc9599137bd 280w, https://mintcdn.com/docs-dev-feat-update-styling-docs-for-universal-components/oquzZmRinmaBtdQK/docs/images/ja-jp/cdy7uua7fh8z/2TZ9jSjgEcARFpULI6hz4R/a4319a1bd482f2ee5cc23100fdb2f42c/New-form-Forms-for-action-use-case.png?w=560&fit=max&auto=format&n=oquzZmRinmaBtdQK&q=85&s=0a4fabaff06dc381900841430454a29e 560w, https://mintcdn.com/docs-dev-feat-update-styling-docs-for-universal-components/oquzZmRinmaBtdQK/docs/images/ja-jp/cdy7uua7fh8z/2TZ9jSjgEcARFpULI6hz4R/a4319a1bd482f2ee5cc23100fdb2f42c/New-form-Forms-for-action-use-case.png?w=840&fit=max&auto=format&n=oquzZmRinmaBtdQK&q=85&s=9b2c441afd01e86ba83fb41320bb9b0f 840w, https://mintcdn.com/docs-dev-feat-update-styling-docs-for-universal-components/oquzZmRinmaBtdQK/docs/images/ja-jp/cdy7uua7fh8z/2TZ9jSjgEcARFpULI6hz4R/a4319a1bd482f2ee5cc23100fdb2f42c/New-form-Forms-for-action-use-case.png?w=1100&fit=max&auto=format&n=oquzZmRinmaBtdQK&q=85&s=014f52ff78255786061a323367f5e50f 1100w, https://mintcdn.com/docs-dev-feat-update-styling-docs-for-universal-components/oquzZmRinmaBtdQK/docs/images/ja-jp/cdy7uua7fh8z/2TZ9jSjgEcARFpULI6hz4R/a4319a1bd482f2ee5cc23100fdb2f42c/New-form-Forms-for-action-use-case.png?w=1650&fit=max&auto=format&n=oquzZmRinmaBtdQK&q=85&s=2426cf3b312f30ee8bb9c88dda894088 1650w, https://mintcdn.com/docs-dev-feat-update-styling-docs-for-universal-components/oquzZmRinmaBtdQK/docs/images/ja-jp/cdy7uua7fh8z/2TZ9jSjgEcARFpULI6hz4R/a4319a1bd482f2ee5cc23100fdb2f42c/New-form-Forms-for-action-use-case.png?w=2500&fit=max&auto=format&n=oquzZmRinmaBtdQK&q=85&s=02f207c95641a1b0d63bb51a3c446f42 2500w" />
</Frame>

### ステップノードを構成する

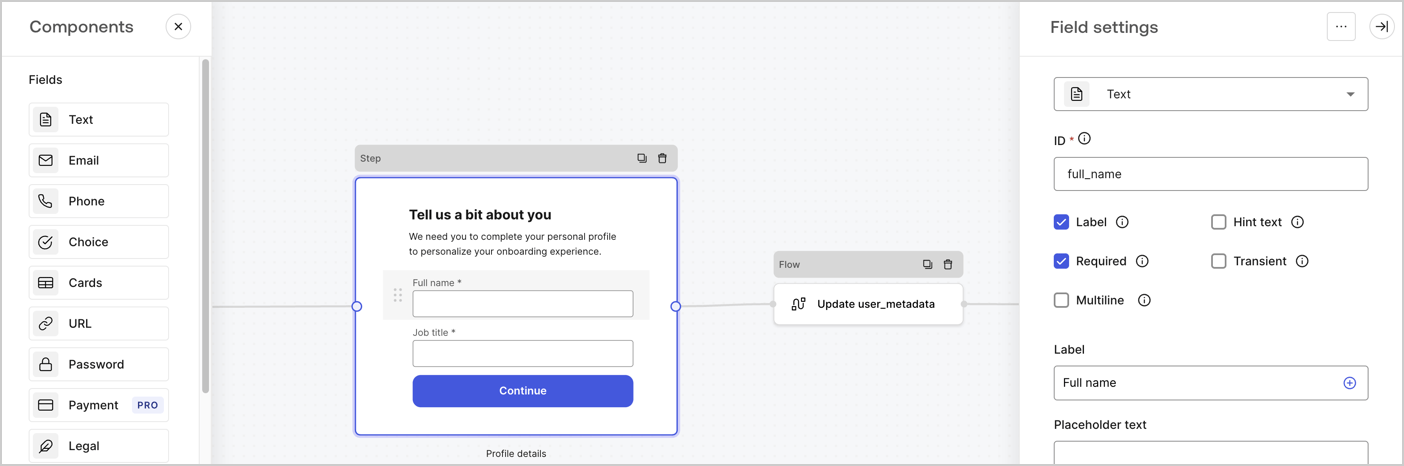
ステップノードは、ユーザーに表示されるグラフィカルインターフェースです。次の手順に従って、ステップノードに[フィールド](/docs/ja-jp/customize/forms/nodes-and-components)を追加し、ユーザーのフルネームと役職の値を収集します。

1. **［Components menu（コンポーネントメニュー）］** から **［Rich text（リッチテキスト）］** フィールドを **［Step（ステップ）］** ノードにドラッグします。

   * **［Rich text（リッチテキスト）］** ：カスタムメッセージを入力します。。
   * **［Save（保存）］** を選択します。
2. **［Text（テキスト）］** フィールドを **［Step（ステップ）］** ノードにドラッグします。

   * **Id** ：`full_name`を入力します。
   * **［Label（ラベル）］** ：`フルネーム`を入力します。
   * **［Label（ラベル）］** ：チェックボックスを有効にします。
   * **［Required（必要）］** ：チェックボックスを有効にします。
   * **［Save（保存）］** を選択します。
3. **［Text（テキスト）］** フィールドを **［Step（ステップ）］** ノードにドラッグします。

   * **Id** ：`job_title`を入力します。
   * **［Label（ラベル）］** ：`役職`を入力します。
   * **［Label（ラベル）］** ：チェックボックスを有効にします。
   * **［Required（必要）］** ：チェックボックスを有効にします。
   * **［Save（保存）］** を選択します。
4. **［Publish（公開）］** を選択し、保存します。

<Frame>
  <img src="https://mintcdn.com/docs-dev-feat-update-styling-docs-for-universal-components/XKR-bft5pYEjoAN5/docs/images/ja-jp/cdy7uua7fh8z/6Kcn0ai9fsVsqHwZpTGByG/37cbf4ffee63a7010926b15f06dd20ac/custom-signup-step-node.png?fit=max&auto=format&n=XKR-bft5pYEjoAN5&q=85&s=a9273c766a3796cf34323c5acb6f3cc8" alt="Dashboard > Actions > Forms > Use Case Custom Signup Steps Step node" data-og-width="1404" width="1404" data-og-height="466" height="466" data-path="docs/images/ja-jp/cdy7uua7fh8z/6Kcn0ai9fsVsqHwZpTGByG/37cbf4ffee63a7010926b15f06dd20ac/custom-signup-step-node.png" data-optimize="true" data-opv="3" srcset="https://mintcdn.com/docs-dev-feat-update-styling-docs-for-universal-components/XKR-bft5pYEjoAN5/docs/images/ja-jp/cdy7uua7fh8z/6Kcn0ai9fsVsqHwZpTGByG/37cbf4ffee63a7010926b15f06dd20ac/custom-signup-step-node.png?w=280&fit=max&auto=format&n=XKR-bft5pYEjoAN5&q=85&s=4f0b213d9f83e99cac91060e6d366a5b 280w, https://mintcdn.com/docs-dev-feat-update-styling-docs-for-universal-components/XKR-bft5pYEjoAN5/docs/images/ja-jp/cdy7uua7fh8z/6Kcn0ai9fsVsqHwZpTGByG/37cbf4ffee63a7010926b15f06dd20ac/custom-signup-step-node.png?w=560&fit=max&auto=format&n=XKR-bft5pYEjoAN5&q=85&s=78aad02423e5332a969415cacf129e13 560w, https://mintcdn.com/docs-dev-feat-update-styling-docs-for-universal-components/XKR-bft5pYEjoAN5/docs/images/ja-jp/cdy7uua7fh8z/6Kcn0ai9fsVsqHwZpTGByG/37cbf4ffee63a7010926b15f06dd20ac/custom-signup-step-node.png?w=840&fit=max&auto=format&n=XKR-bft5pYEjoAN5&q=85&s=145a519420f82e4ec0c26b88c16aeb67 840w, https://mintcdn.com/docs-dev-feat-update-styling-docs-for-universal-components/XKR-bft5pYEjoAN5/docs/images/ja-jp/cdy7uua7fh8z/6Kcn0ai9fsVsqHwZpTGByG/37cbf4ffee63a7010926b15f06dd20ac/custom-signup-step-node.png?w=1100&fit=max&auto=format&n=XKR-bft5pYEjoAN5&q=85&s=41fb1c7d37607721e8cbb04d0a1cf66e 1100w, https://mintcdn.com/docs-dev-feat-update-styling-docs-for-universal-components/XKR-bft5pYEjoAN5/docs/images/ja-jp/cdy7uua7fh8z/6Kcn0ai9fsVsqHwZpTGByG/37cbf4ffee63a7010926b15f06dd20ac/custom-signup-step-node.png?w=1650&fit=max&auto=format&n=XKR-bft5pYEjoAN5&q=85&s=6ecd1bd0b955b0ceb03b46dab5fd7911 1650w, https://mintcdn.com/docs-dev-feat-update-styling-docs-for-universal-components/XKR-bft5pYEjoAN5/docs/images/ja-jp/cdy7uua7fh8z/6Kcn0ai9fsVsqHwZpTGByG/37cbf4ffee63a7010926b15f06dd20ac/custom-signup-step-node.png?w=2500&fit=max&auto=format&n=XKR-bft5pYEjoAN5&q=85&s=33589ec05bae097659d6beb5b2c0cb2d 2500w" />
</Frame>

### フローノードの構成

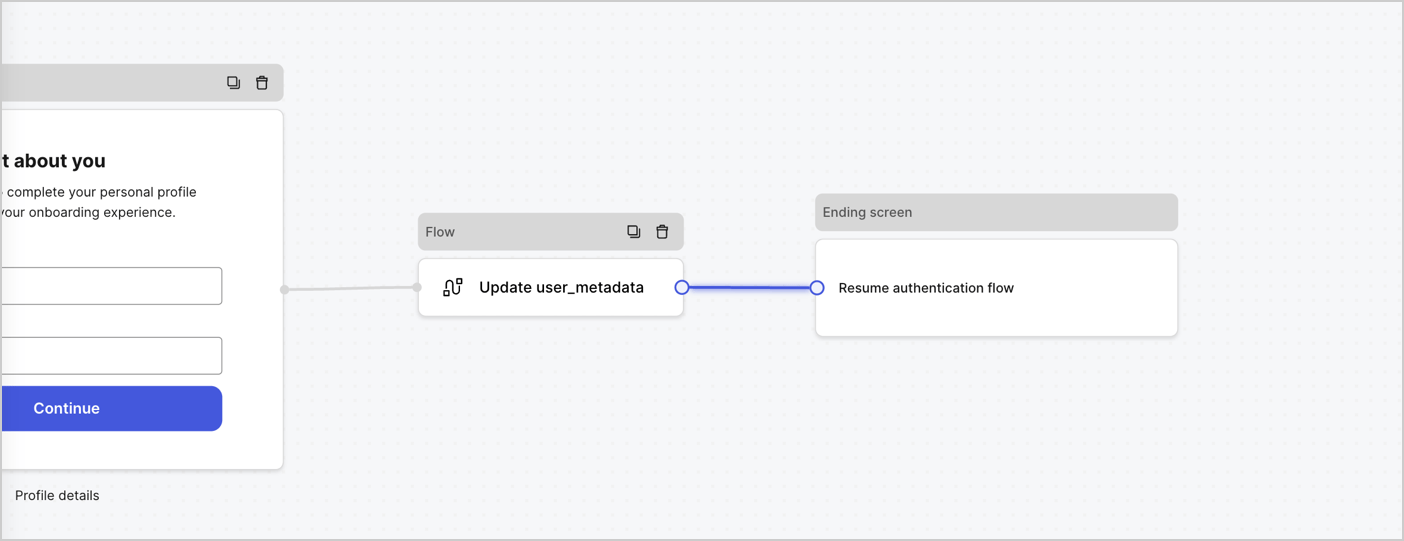
次の手順に従って、 **［Step（ステップ）］** ノードの後に​​ **［Flow（フロー）］** ノードを追加し、`user_metadata`を更新して認証フローを再開します。

1. フォームエディターの下にある **［Flow（フロー）］** を選択します。
2. **［Step（ステップ）］** と **［Ending Screen（終了スクリーン）］** ノードの間にある既存のリンクを削除します。
3. 新しい **［Flow（フロー）］** > **［Click to add a flow（クリックして、フローを追加する）］** > **［Create a new flow（新しいフローを作成する）］** を選択します。

   * **［Name（名前）］** フィールドに`Update user_metadata`を入力します。
   * **［Create（作成）］** を選択します。
   * **［Save（保存）］** を選択します。
4. 下の画像のように **［Step（ステップ）］** と **［Ending Screen（終了スクリーン）** ノードに **［Flow（フロー）］** ノードをリンクします。
5. **［Publish（公開）］** を選択し、保存します。

<Frame>
  <img src="https://mintcdn.com/docs-dev-feat-update-styling-docs-for-universal-components/1QNTQk8Nobt3KV7D/docs/images/ja-jp/cdy7uua7fh8z/4nTdYdA2Hu5vK65smkdvJg/db3294ebc25a7c2636be96362a3ea56e/custom-signup-step-flow.png?fit=max&auto=format&n=1QNTQk8Nobt3KV7D&q=85&s=defc9f3270aefbe8dcd7ea940238e836" alt="Dashboard > Actions > Forms > Use Case Custom Signup Step Update User metadata flow" data-og-width="1404" width="1404" data-og-height="541" height="541" data-path="docs/images/ja-jp/cdy7uua7fh8z/4nTdYdA2Hu5vK65smkdvJg/db3294ebc25a7c2636be96362a3ea56e/custom-signup-step-flow.png" data-optimize="true" data-opv="3" srcset="https://mintcdn.com/docs-dev-feat-update-styling-docs-for-universal-components/1QNTQk8Nobt3KV7D/docs/images/ja-jp/cdy7uua7fh8z/4nTdYdA2Hu5vK65smkdvJg/db3294ebc25a7c2636be96362a3ea56e/custom-signup-step-flow.png?w=280&fit=max&auto=format&n=1QNTQk8Nobt3KV7D&q=85&s=f4c020d863956f50c74b17f699f60e5c 280w, https://mintcdn.com/docs-dev-feat-update-styling-docs-for-universal-components/1QNTQk8Nobt3KV7D/docs/images/ja-jp/cdy7uua7fh8z/4nTdYdA2Hu5vK65smkdvJg/db3294ebc25a7c2636be96362a3ea56e/custom-signup-step-flow.png?w=560&fit=max&auto=format&n=1QNTQk8Nobt3KV7D&q=85&s=3a23b8fbb5f2aa4fcac3cb90c9c38af5 560w, https://mintcdn.com/docs-dev-feat-update-styling-docs-for-universal-components/1QNTQk8Nobt3KV7D/docs/images/ja-jp/cdy7uua7fh8z/4nTdYdA2Hu5vK65smkdvJg/db3294ebc25a7c2636be96362a3ea56e/custom-signup-step-flow.png?w=840&fit=max&auto=format&n=1QNTQk8Nobt3KV7D&q=85&s=6df33d17175ec12e3762daa95b56249d 840w, https://mintcdn.com/docs-dev-feat-update-styling-docs-for-universal-components/1QNTQk8Nobt3KV7D/docs/images/ja-jp/cdy7uua7fh8z/4nTdYdA2Hu5vK65smkdvJg/db3294ebc25a7c2636be96362a3ea56e/custom-signup-step-flow.png?w=1100&fit=max&auto=format&n=1QNTQk8Nobt3KV7D&q=85&s=5bbed5c57c82f00749d3d3fdd5914689 1100w, https://mintcdn.com/docs-dev-feat-update-styling-docs-for-universal-components/1QNTQk8Nobt3KV7D/docs/images/ja-jp/cdy7uua7fh8z/4nTdYdA2Hu5vK65smkdvJg/db3294ebc25a7c2636be96362a3ea56e/custom-signup-step-flow.png?w=1650&fit=max&auto=format&n=1QNTQk8Nobt3KV7D&q=85&s=718beddd8c3e931717571831c784c240 1650w, https://mintcdn.com/docs-dev-feat-update-styling-docs-for-universal-components/1QNTQk8Nobt3KV7D/docs/images/ja-jp/cdy7uua7fh8z/4nTdYdA2Hu5vK65smkdvJg/db3294ebc25a7c2636be96362a3ea56e/custom-signup-step-flow.png?w=2500&fit=max&auto=format&n=1QNTQk8Nobt3KV7D&q=85&s=081cad53d4e374ba095f60265fa7a776 2500w" />
</Frame>

Auth0ユーザーの更新アクションをフローに追加するには、次の手順に従います。

1. **［Flow（フロー）］** の **［Update user\_metadata（user\_metadataの更新）］** > **［Edit flow（フローの編集）］** を選択し、新しいタブでフローエディターを開きます。
2. アクションの開始の下にある **［+］** アイコンを選択し、 **Update user（ユーザーの更新）** アクションを追加します。以下のフィールドに記入して、 **［Save（保存）］** を選択し、続けてください。

   * **Connection（接続）** ：ドロップダウンからM2MアプリケーションへのVault接続を選択します。

   * **User ID（ユーザーID）** ：`{{context.user.user_id}}`と入力します。

   * **［Body（ボディ）］** ：次のコードをコピーして貼り付け、`full_name`および`job_title`プロパティを使用してuser\_metadataを更新します。

     ```json lines theme={null}
     {
       "user_metadata": {
         "full_name": "{{fields.full_name}}",
         "job_title": "{{fields.job_title}}"
       }
     }
     ```

   * **［Save（保存）］** を選択します。
3. ［Publish（公開）］を選択し、保存します。

## フォームレンダーコードを取得する

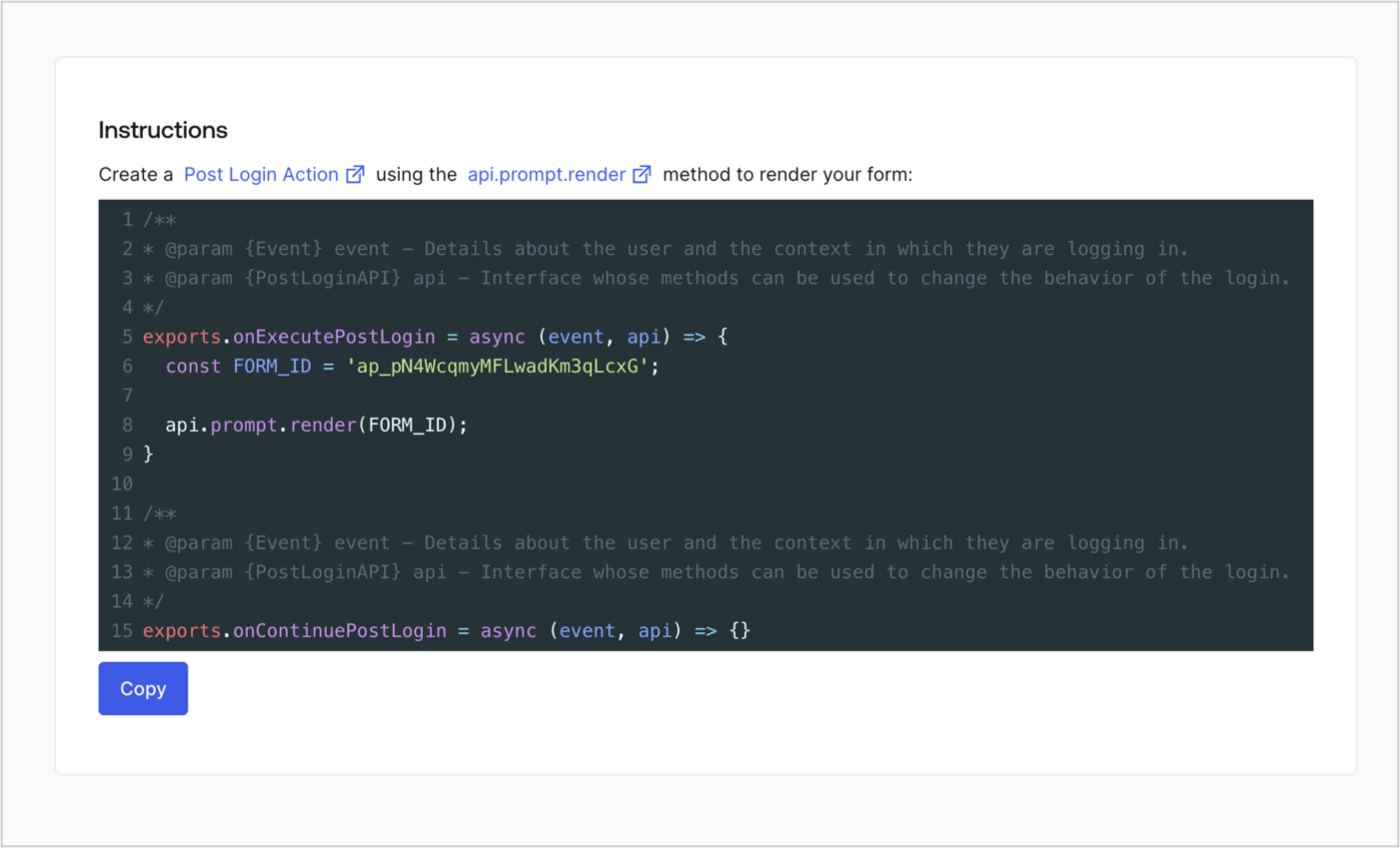
次の手順に従って、フォームレンダーコードを取得して、カスタムのログイン後アクションを使ったフォームを視覚的にレンダリングします。

* Formディターから **`<>`［Render（レンダー）］** を選択します。
* **［Copy（コピー）］** を選択します。

<Frame>
  <img src="https://mintcdn.com/docs-dev-feat-update-styling-docs-for-universal-components/oquzZmRinmaBtdQK/docs/images/ja-jp/cdy7uua7fh8z/2EIUzc539sq9lwoTKbjoJv/496a864c0fc44a782c9cadca119dbfb0/embed.png?fit=max&auto=format&n=oquzZmRinmaBtdQK&q=85&s=6b56b87429e316ff31c8613ae549e1af" alt="Dashboard > Actions > Forms > Form > Embed" data-og-width="1400" width="1400" data-og-height="848" height="848" data-path="docs/images/ja-jp/cdy7uua7fh8z/2EIUzc539sq9lwoTKbjoJv/496a864c0fc44a782c9cadca119dbfb0/embed.png" data-optimize="true" data-opv="3" srcset="https://mintcdn.com/docs-dev-feat-update-styling-docs-for-universal-components/oquzZmRinmaBtdQK/docs/images/ja-jp/cdy7uua7fh8z/2EIUzc539sq9lwoTKbjoJv/496a864c0fc44a782c9cadca119dbfb0/embed.png?w=280&fit=max&auto=format&n=oquzZmRinmaBtdQK&q=85&s=717ab67b5afc7a6cbbe1c221a442139f 280w, https://mintcdn.com/docs-dev-feat-update-styling-docs-for-universal-components/oquzZmRinmaBtdQK/docs/images/ja-jp/cdy7uua7fh8z/2EIUzc539sq9lwoTKbjoJv/496a864c0fc44a782c9cadca119dbfb0/embed.png?w=560&fit=max&auto=format&n=oquzZmRinmaBtdQK&q=85&s=b0a144ba1e7e6225bae4162bd3148d86 560w, https://mintcdn.com/docs-dev-feat-update-styling-docs-for-universal-components/oquzZmRinmaBtdQK/docs/images/ja-jp/cdy7uua7fh8z/2EIUzc539sq9lwoTKbjoJv/496a864c0fc44a782c9cadca119dbfb0/embed.png?w=840&fit=max&auto=format&n=oquzZmRinmaBtdQK&q=85&s=0c0fa5731dead8a16dec5bdedd2fa511 840w, https://mintcdn.com/docs-dev-feat-update-styling-docs-for-universal-components/oquzZmRinmaBtdQK/docs/images/ja-jp/cdy7uua7fh8z/2EIUzc539sq9lwoTKbjoJv/496a864c0fc44a782c9cadca119dbfb0/embed.png?w=1100&fit=max&auto=format&n=oquzZmRinmaBtdQK&q=85&s=d3308d1656dbffff728065f7e732d743 1100w, https://mintcdn.com/docs-dev-feat-update-styling-docs-for-universal-components/oquzZmRinmaBtdQK/docs/images/ja-jp/cdy7uua7fh8z/2EIUzc539sq9lwoTKbjoJv/496a864c0fc44a782c9cadca119dbfb0/embed.png?w=1650&fit=max&auto=format&n=oquzZmRinmaBtdQK&q=85&s=98eb083e316efbb1d1459024e22db45b 1650w, https://mintcdn.com/docs-dev-feat-update-styling-docs-for-universal-components/oquzZmRinmaBtdQK/docs/images/ja-jp/cdy7uua7fh8z/2EIUzc539sq9lwoTKbjoJv/496a864c0fc44a782c9cadca119dbfb0/embed.png?w=2500&fit=max&auto=format&n=oquzZmRinmaBtdQK&q=85&s=f6ad10dcc6fcc9a778c6892f0284a6ac 2500w" />
</Frame>

## ポストログインアクションの作成

ポストログインアクションを作成してフォームをレンダリングするには、次の手順に従います。

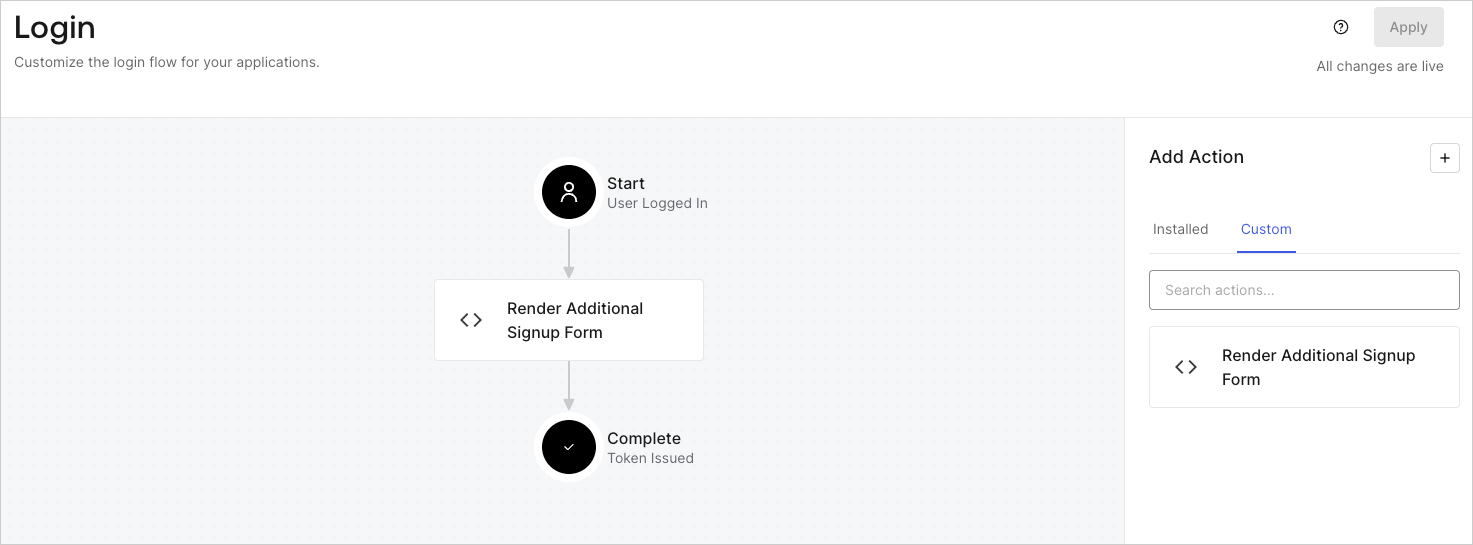
1. **［Auth0 Dashboard（Auth0ダッシュボード）］>［Actions（アクション）］>［Flows（フロー）］>［Login（ログイン）］** に移動します。
2. **+** アイコンを選択し、 **［Build from scratch（初めから構築する）］** を選択します。

   * **［Name（名前）］** ：`［Render Additional Signup Form（追加サインアップフォームのレンダリング）］`を入力します。
   * **［Trigger（トリガー）］** ：`［Login / Post Login（ログイン/ログイン後）］`を選択します。
   * **［Runtime（ランタイム）］** ：推奨バージョンを選択します。
3. **［Create（作成）］** を選択します。

ログイン後アクションを構成するには：

1. 既存のコードをコードエディターから削除します。

2. フォームレンダリングコードをコードエディターにペーストします。

3. コードを編集して、フォームをレンダリングする条件ロジックを定義します。

   ```javascript lines theme={null}
   /**
   * @param {Event} event - Details about the user and the context in which they are logging in.
   * @param {PostLoginAPI} api - Interface whose methods can be used to change the behavior of the login.
   */
   exports.onExecutePostLogin = async (event, api) => {
     const FORM_ID = 'REPLACE_WITH_YOUR_FORM_ID';

     if (
       !event.user.user_metadata.full_name &&
       !event.user.user_metadata.job_title
     ) {
       api.prompt.render(FORM_ID);
     }
   }

   exports.onContinuePostLogin = async (event, api) => { }
   ```

   <Callout icon="file-lines" color="#0EA5E9" iconType="regular">
     上の例にあるコードでは、ユーザーのメタデータにfull\_nameプロパティとjob\_titleプロパティがない場合にフォームが表示されます。
   </Callout>

4. **［Deploy（導入）］** を選択します。

5. **［Render Additional Signup Form（追加サインアップフォームのレンダリング）］** アクションを **［Login（ログイン）］** フローにドラッグ＆ドロップします。

   <Frame>
     <img src="https://mintcdn.com/docs-dev-feat-update-styling-docs-for-universal-components/_9QPJT8jkq4a-nWn/docs/images/ja-jp/cdy7uua7fh8z/1WBOicIOcH98hKj6Lq9HF2/4951e30a0cc08c7c5daa0116eaa17e11/Screenshot_2024-03-01_at_15.48.00.png?fit=max&auto=format&n=_9QPJT8jkq4a-nWn&q=85&s=b8f2a22882ed0c0fec7935aedfd5a5fd" alt="Dashboard > Forms > Use Cases Custom Signup Steps Login Flow" data-og-width="1473" width="1473" data-og-height="545" height="545" data-path="docs/images/ja-jp/cdy7uua7fh8z/1WBOicIOcH98hKj6Lq9HF2/4951e30a0cc08c7c5daa0116eaa17e11/Screenshot_2024-03-01_at_15.48.00.png" data-optimize="true" data-opv="3" srcset="https://mintcdn.com/docs-dev-feat-update-styling-docs-for-universal-components/_9QPJT8jkq4a-nWn/docs/images/ja-jp/cdy7uua7fh8z/1WBOicIOcH98hKj6Lq9HF2/4951e30a0cc08c7c5daa0116eaa17e11/Screenshot_2024-03-01_at_15.48.00.png?w=280&fit=max&auto=format&n=_9QPJT8jkq4a-nWn&q=85&s=b4bf7ff2c96b9d06a74f7f97013d7dc4 280w, https://mintcdn.com/docs-dev-feat-update-styling-docs-for-universal-components/_9QPJT8jkq4a-nWn/docs/images/ja-jp/cdy7uua7fh8z/1WBOicIOcH98hKj6Lq9HF2/4951e30a0cc08c7c5daa0116eaa17e11/Screenshot_2024-03-01_at_15.48.00.png?w=560&fit=max&auto=format&n=_9QPJT8jkq4a-nWn&q=85&s=d29923e7405a0ce54fbe6a1901db6126 560w, https://mintcdn.com/docs-dev-feat-update-styling-docs-for-universal-components/_9QPJT8jkq4a-nWn/docs/images/ja-jp/cdy7uua7fh8z/1WBOicIOcH98hKj6Lq9HF2/4951e30a0cc08c7c5daa0116eaa17e11/Screenshot_2024-03-01_at_15.48.00.png?w=840&fit=max&auto=format&n=_9QPJT8jkq4a-nWn&q=85&s=c83198c11fc2ab6ec6ad7088d3531394 840w, https://mintcdn.com/docs-dev-feat-update-styling-docs-for-universal-components/_9QPJT8jkq4a-nWn/docs/images/ja-jp/cdy7uua7fh8z/1WBOicIOcH98hKj6Lq9HF2/4951e30a0cc08c7c5daa0116eaa17e11/Screenshot_2024-03-01_at_15.48.00.png?w=1100&fit=max&auto=format&n=_9QPJT8jkq4a-nWn&q=85&s=52b6e5f2bfd969bbe1b547f483bc122d 1100w, https://mintcdn.com/docs-dev-feat-update-styling-docs-for-universal-components/_9QPJT8jkq4a-nWn/docs/images/ja-jp/cdy7uua7fh8z/1WBOicIOcH98hKj6Lq9HF2/4951e30a0cc08c7c5daa0116eaa17e11/Screenshot_2024-03-01_at_15.48.00.png?w=1650&fit=max&auto=format&n=_9QPJT8jkq4a-nWn&q=85&s=c3d3b18a75c8383524f1f16757dd457c 1650w, https://mintcdn.com/docs-dev-feat-update-styling-docs-for-universal-components/_9QPJT8jkq4a-nWn/docs/images/ja-jp/cdy7uua7fh8z/1WBOicIOcH98hKj6Lq9HF2/4951e30a0cc08c7c5daa0116eaa17e11/Screenshot_2024-03-01_at_15.48.00.png?w=2500&fit=max&auto=format&n=_9QPJT8jkq4a-nWn&q=85&s=fb1a65b259898563b9cea341d994c5bb 2500w" />
   </Frame>

6. **［Apply（適用）］** を選択します。

### 実装のテスト

次の手順に従って実装をテストします。

* 新規ユーザーでアプリケーションにサインアップします。
* ログインフローのログイン後アクションでは、フォームがレンダリングされ、情報の入力が求められます。
* **［<Tooltip data-tooltip-id="react-containers-DefinitionTooltip-0" href="/docs/ja-jp/glossary?term=auth0-dashboard" tip="Auth0 Dashboard: サービスを構成するためのAuth0の主製品。" cta="用語集の表示">Auth0 Dashboard</Tooltip>（Auth0ダッシュボード）］>［User Management（ユーザー管理）］>［Users（ユーザー）］** を選択し、新しいユーザーを見つけ、その属性`full_name`および`job_title`が追加サインアップステップからの情報を含んでいることを検証します。